
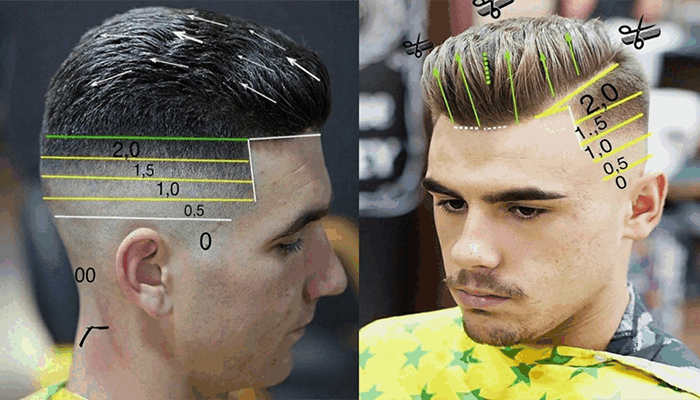
How To Do A Fade Haircut With Clippers At Home
In order to make a proper fade on the sides and back you will have to create fade lines around the head and blend them together. To make the proper fade haircut, follow the following steps.
<>Also Read-Best Practical Performance Appraisal To Boost Employee
Step 01:-Set The Clipper To Number 0 (Zero)
- That’s bare blades with no guard attachment and the lever is all way up, don’t forget to keep the hair dry as it will be much easier to work with and won’t clog up the clippers.
- Hair below line zero should be cut against the direction the hair normally grows, to produce a clean straight line just reverse the clippers.
- Carefully place the reverse clippers at a right angle to the head, tips of the blades slightly touching the skin, tidy up the edges in order to make this cut as clean as possible.
- Take your time with this step and make sure that no patches are left behind, do the same on the other side and always remember to check both sides. Doing this will ensure a symmetrical haircut.
- Don’t forget to clean up any stray hairs on the neck, below hairline.
Step 02:-Set The Clipper To 0.5
- This new fade line should be about half an inch above the zero fade line. Set the clippers to 0.5, that’s bare blades with no guard attachment and the lever all the way down.
- Start below the previous fade line and work upward in short even strokes.
- You will notice that the zero fade line disappears as it will gradually blend into the new fade line. Gently fold the ears forward when cutting around them in order to get a more accurate, precise and safer cut.
- Try to keep as consistent as possible all the way around the head moving the clippers sideways over the fade line with multiple short strokes up and out in a scooping motion.
- Remember to shave against the direction of hair growth this will guarantee a smooth feed transition.
<>Also Read-How To Grow Chickpeas In Your Garden
Step 03:-Set The Clipper To 1
- Simply repeat the process again, another half inch higher on the head with the clippers guard attachment number one, but this time with the lever up.
- Basically switching to longer clipper guards as you move up to each new fade line will produce a smooth fade look, when done correctly. It should be a nice even fade, with no visible lines remaining.
Step 04:-Set The Clipper To 1.5
This time set your clipper guard to 1.5 that is Clippers with guard attachment number one and lover all the way down.
Step 05:-The Final Step With Clipper 2
- We use guard attachment number 2 and keep the lever up.
- Repeat the previous process again another half inch higher, however this time using a scoop out motion as this makes it easier to blend with the longer hair on top afterwards.
Blend The Top Into The Sides
- There are different ways to do this, but today, we will show the clipper over comb technique.
- Start with your comb slightly below the blend line, pointing the comb directly upwards, the hair protruding from the comb will act as a guide for the desired length.
- Comb upwards till the shorter clipped hair disappears behind the comb, then tilt the comb away from the head.
- Hold your comb still and cut the excess longer hair, if possible use a bigger comb for this technique, as it will make smoother blending.
- Repeat this process, gradually trimming down the longer top hair till it blends in with a shorter clipped hair.
- Be careful and cut a little bit less than needed, instead repeat the process to acquire the desired length. If you prefer you can use scissors for blending.
<>Also Read-9 Desk Setup Tips For Work From Home
Thank you so much for reading this article. We hope you enjoyed this haircut ideas and steps and maybe learn something new. Make sure to leave any questions in the comments below and share this article if you found it helpful. Come back and visit our site to find more useful articles.