
How To Grow Chickpeas In Your Garden
Growing chickpeas or garbanzo beans in your garden is easy in this article we will lead you all the steps for growing lots of chickpeas in your home garden.
You can easily get white chickpeas at your grocery store, it’s sold in its dry form and the seeds are viable for a long time. Black chickpeas or the kabuli chickpea variety which is also something you can get at your grocery store.
<>Also Read-13 Essential Unwritten Rules For Air Travelers
Step-01
- Add water and soak the seeds.
- Chickpeas are very dry and need to be hydrated before they germinate, so add water and soak overnight or around 8 hours.
- After around 8 hours of soaking this is how they look like.
Step-02
- Germinating the seeds, use a Ziploc pouch and a wet paper towel to germinate our chickpeas. Remember to squeeze most of the water out of the paper towel.
- All we do is lay our seeds out on the wet paper towel, spread it around a bit so they are evenly spaced and then wrap the paper towel.
- Then place your paper towel in your ziploc pouch and this can be sealed to prevent moisture from escaping and also create the humidity that these seeds need for germination.
- This is your mini greenhouse for germination, leave this in a warm area like your kitchen countertop or your closet for around 3 days. You can keep it in a dark or lit area.
- Chickpeas grow best in temperatures from 70 to 80 degrees you should do this around six to eight weeks before the last frost date in your area.
- 3 days later you should open up your paper towel and check if the seeds have germinated and as we open this up you can see that the seeds have germinated very well.
- While you can direct sow seeds i highly recommend this method for the fastest germination, you can clearly see the roots being sent out, this gives you a big head start in your chickpea growing journey.
Step-03
- Plant these chickpeas seeds in small seed starting cells where, they will grow for a few days.
- This step is needed to eliminate the seeds that do not germinate well or do not grow well and pick the strongest seedlings to transplant later.
- After you label your seed rows make small holes in the soil where the seeds will go and then drop one seed in each cell with the root side facing down, even if you don’t position the seed correctly it’s okay they will grow.
- Now moving on to the white chickpeas we are going to do the same note that white chickpeas are significantly larger seed size plant size and harvest size as well.
- However we found that black chickpeas also grow vigorously and are equally good eaten fresh which we will get to in just a bit.
- Five days later you can see that the chickpea seedlings have emerged they are looking nice and green they do not need any fertilizer yet as they are getting their energy from the nutrients stored in the seed itself.
- Seven days later the plants have picked up even more and are now beginning to grow their second set of leaves you can see that the black chickpeas also have a slightly better germination and growth rate which means they will be ready for transplanting in about another seven days or so.
- Then apply a mild fertilizer use any organic fertilizer at quarter strength a few days later the seedlings are ready for transplanting you can see how beautiful and healthy these leaves are.
- Pull out each seedling from the cell and you are now ready to transplant.
Step-04
In this step we use the method of potting for transplanting.
- We use cups which we get from our local market, you can make drain holes in the bottom which are very important and these cups are extremely good in quality and are reusable and the best part is that they are very cheap compared to buying pots specifically for gardening purposes.
- Fill these cups with potting mix, use a good quality potting mix your plant will need nutrients at this stage to grow.
- Fill up about 3/4 of the cup with the potting mix, do not fill to the top as this will make planting difficult, you want your seedlings to be almost root bound before you up pot them.
- Taking a close look at our seedling you can see how nicely the roots have grown in this seed starting mix. We place our seedling in a cup and then add potting mix around it to secure it in place. This is why you need to fill your cups only till they’re about 3/4 full initially, so this planting process can be done.
- Pack the soil around the plant and then do this for all your seedlings. We also have labeled our cups with the variety that we are growing.
Planting is done and we are now ready for a very important next step which is watering our seedlings.
Step-05
Don’t worry if the seedlings droop a little you can set them right as you are watering them, give them a good soaking. They are nicely hydrated and ready to grow taller.
Planting The Chickpeas In Raised Containers
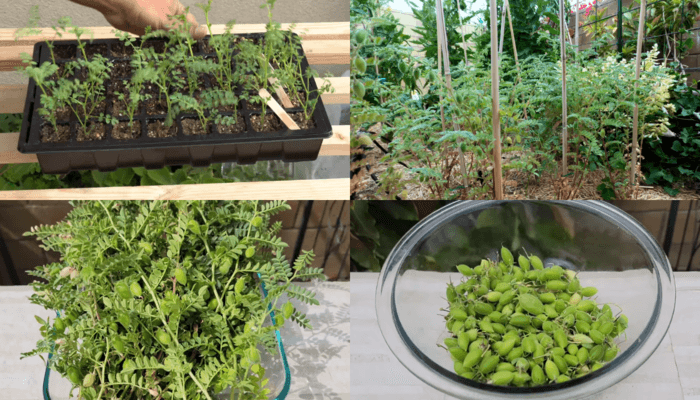
- 30 days later you can begin transplanting your seedlings, you grew your chickpeas in raised containers.
- You just take out the seedling you can see all wonderful roots that have formed on the bottom. The plant looks very healthy and it’s the right time to transplant.
- make sure you don’t plant too deep, you want your soil to be at the same level as it was in the cup, you may also use some liquid organic fertilizer every 15 days if your potting mix is reused or its new make sure that you add some nutrients to it while planting.
Planting The Chickpeas In Raised Beds
- While you can plant chickpeas very close together, they actually support each other when planted closely.
- You will be planting them in rows about 6 inches apart.
- Look at all these amazing roots look at how nice and fluffy the soil is this is the soil you want when planting.
- We generally do not recommend digging unless you have a lot of roots remaining from the previous crop even then the older roots will slowly decompose and become food for your plants and remember to add fresh compost and worm castings on the top of your beds every few months.
Step-06
- Protect the plants from winds, we are going to be staking them.
- This is optional but you may like doing this to keep the plants clean and looking good.
- Use bamboo stake, to secure the plants in place and then use some wire ties to tie them up against the bamboo stick.
We have finished planting all the plants now and they will look to droop a bit which is perfectly fine. Just as a reminder, March is the best season for chickpeas to grow make sure you water the plants well, you must water deeply at the time of planting.
Step-07
- As far as insects and diseases go aphids and worms can attack chickpeas.
- If you see insect damage signs use insecticidal soap or neem oil sprays.
- Since the pods are very tender and can absorb most sprays its better not to spray anything and just use a water hose to wash off any insects you see and this is a very effective technique.
- A few days later you can see that there’s more growth.
If you’re growing these plants to eat the leaves which are edible by the way add nitrogen rich fertilizers but to get the most amount of chickpeas you need to make sure that you’re adding a low nitrogen high phosphorous fertilizer which will encourage blooming and hence chickpea production and they have started blooming as well.
<>Also Read-Marvel’s Studios ‘What If…? Season-2’|Disney+2023
Conclusion
40 days later you can see that the plants have really taken off and are loaded with fresh chickpeas as you can see. After your first harvest your chickpea plants have now matured completely and you will be remove the entire plants, as we are harvesting it’s important to remember that chickpeas are grown best in the spring and fall weather.
We hope these steps and tips to growing chickpeas will encourage you to grow chickpeas in your garden. If you like this article then please revisited our website to get awesome ideas like these in the future.